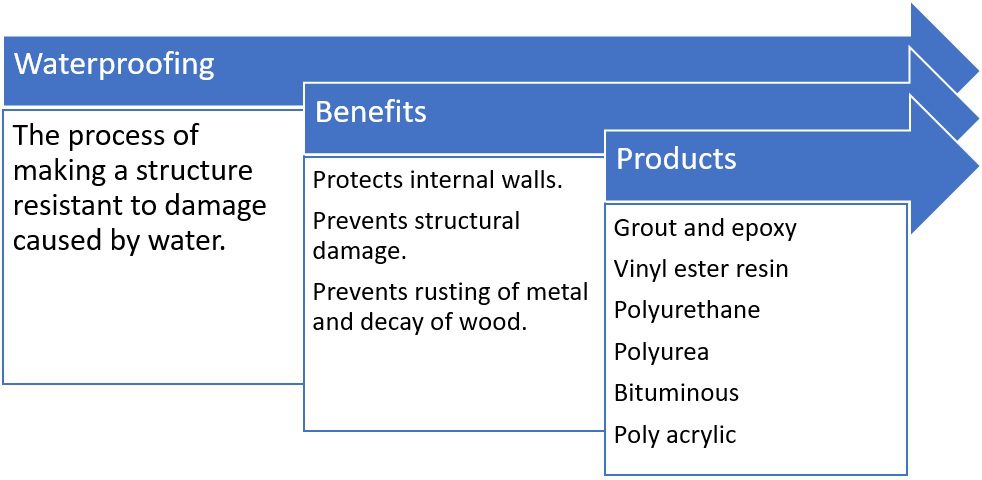
The Main Principles Of Waterproofing Auckland
The below ground water locates the means of least resistance through the filter media. The water is gathered in the perforated pipelines via the filter media. Due to the inclines offered, this water is further accumulated in the chambers in between. All the water hence carried away. is ultimately collected in the deepest chamber or sump.
The treatment for the below ground water tank coincides as that of the basement, besides the adhering to points. A stipulation for a pump sump is made, instead of the rain gutter setup. The overflow pipeline is located at the wanted level, to drain out the excess water. Check this pipe for its rigidity prior to the waterproofing work procedure.
Water is sprinkled on this machan and dry cement is spread on the work area for 15 minutes. The joints between these two items should not go beyond 3 to 4 mm.
Waterproofing Auckland Can Be Fun For Everyone
If white or colored joints are called for, then the grey cement joints are raked, and white concrete or shade cement slurry is used with a tiny traverse the surface for joints of a coordinating color. The surface is once more cleaned up with sawdust. to remove excess white or shade cement sticking to the polished china mosaic surface.
Bonus product is cut off with a putty blade and a smooth upright joint is developed. Considering that the sealer is very costly, utilize it.
For water-proofing of the straight development joint, arrangements ought to begin from the R.C.C. stage of the building. Inverted beam of lights are taken to the area, for the development joint, side by side.
Socketing (stress grouting)' is a treatment to grout the concrete slurry by stress right into the porous concrete member. Following a sequence of the work procedure.
See This Report about Waterproofing Auckland
Deal With 25mm (1) G.I. socket over the steel, utilizing abundant cement mortar around the outlet and metal. If the waterproofing job procedure is not done appropriately, it can position troubles. Repair work and also maintenance of waterproofing can verify very bothersome for the customer.
is where the maximum water is made use of. Typically, the moms and dad piece of the W.C. system has an I.W.C. Frying pan and a concrete situation of dimension 0. 9m x 1. 2m x 0. 6m. This case is water-proofed after repairing the essential accessories such as P-trap, C.I. piece, W.C. frying pan, and so on unit can suggest the numerous factors of leakages, as provided below. The joint in between the C. 1/P. V.C. item and also P trap. The joint between the (tee) of outer vertical pile and P.V.C./ C.I. item. The joint in between the P-trap and also I.W.C. pan. The joint between the flushing pipeline as well as I.W.C frying pan. All these joints ought to be secured with the correct sealer, at the respective stages during the implementation of the job.
Check the joint between the P-trap and L.W.C. frying pan from above, by putting a hand right into the catch. Inspect the joint between the flushing pipe and L.W.C. frying pan by damaging just one ceramic tile, fitted precisely over the junction.
All About Waterproofing Auckland
Open up the "Tee' of the vertical pile from the outside, with a ladder or zula and also observe the joint of C.I. piece and Tee' with torchlight as well as seal it appropriately. If leakage still continues, burst the hidden flushing G.I. pipe and also check if it is water tight. Replace the dripping pipe/G. I.
If this does not stop the leak, break open the complete system and inspect the joint at the P-trap as well as C.I./ useful content P.V.C. pipeline. Do the brand-new waterproofing work treatment completely with utmost care. Usually, 90% of leakages quit, if we execute the repair as stated above, in the initial four points.
This can be inspected by stopping the operation of the laundry hand container and keeping these lines totally dry as well as running them once more after 4-5 days. If the leakages dry out and start, the source is with these lines.
If leaks still linger, try socketing and grouting of cement slurry in the affected part. Break open the shower room waterproofing job treatment and also re-do it meticulously. A common and successful method for dealing with small Get the facts leaks is to deal with the damaged section with concrete slurry. Use the cement slurry from the top as well Homepage as let it penetrate in the cracks through the top portion.
Waterproofing Auckland Fundamentals Explained
Examine the afflicted portion of the terrace using a wood mallet and inspect if it has peeled. Get rid of the loose portion with a sculpt and hammer. Re-do it carefully. If the leak is from the corners or from the parapet wall surface, then load all the cracks after damaging it open with cement.
Some chemicals are advised for blending with concrete, at the time of concreting. The traditional technique of brickbat coba is still the most prominent of water-proofing approach in India. Waterproofing compounds are normally available in powder as well as fluid form, as they offer the twin purpose of waterproofing job treatment and warm insulating.
Ensure that the socketing is done before the base coat work. Make sure that there is no leak from the bath W.C. slab once the socketing is done. Make sure that the catches and release pipes are dealt with correctly before the brickbat coba layer. Make certain that all the brickbats are well-soaked in water, before use.
Preserve a correct void between the brickbats. Check the slope of the brickbat coat, towards the catch. Make sure that the water-proofing substance is blended in the mortar, for every stage of work. The topcoat must be performed in one stroke, with no joints. Guarantee appropriate completing near catches as well as spouts.